

I originally created this guide during the 2020 lockdowns. Since then, it’s become my most popular post, and I’ve updated it for 2025 with the latest smartphone technology, current photography trends, and new product recommendations to help you capture stunning DIY newborn photos at home.
I thought it might be helpful to give you some tips on how to DIY your newborn baby’s photos at home. These definitely do not replace having a professional photographer come in but I hope they can at least give you a few cute photos of your baby while you wait for your actual session. I’m going to cover some basics of lighting and highlight a few poses you can easily do at home with your camera phone!
Table of Contents

2025 Newborn Photography Trends for DIY Sessions
Before we dive into the how-to, let’s talk about what’s trending in newborn photography in 2025. As someone who’s photographed hundreds of newborns, I’ve seen these trends emerge:
Minimalist & Authentic Approach: Gone are the elaborate props and staged setups. 2025 is all about capturing your baby’s natural beauty with soft, neutral tones and simple compositions.
Documentary-Style Moments: Focus on real interactions – a gentle yawn, tiny fingers grasping yours, or peaceful sleep positions. These unscripted moments create timeless images.
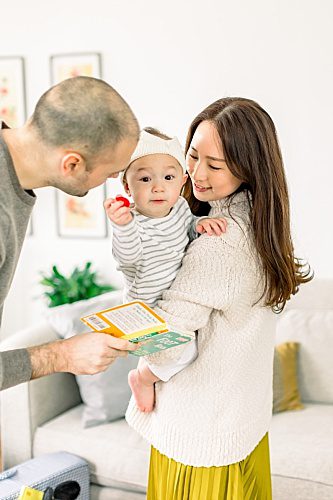
Family Connection: Include siblings, pets, and parents in natural interactions rather than stiff poses. These photos tell your family’s unique story.
Sustainable Choices: Use items you already have – family heirloom blankets, simple onesies, and natural lighting instead of purchasing specialized props.

Location
Let’s start by picking a location in your home for your DIY newborn photos. I’m going to keep things simple and suggest the nursery and master bedroom. These are the two locations I typically use in a Charlottesville or Richmond VA newborn photography session and they provide great backdrops for your photos. Need some ideas on nursery decor and items that will make your nursery look beautiful in photos? Check out my Amazon storefront for a curated list of my favorites!
Make sure to clear the clutter in both rooms before doing your photos. For the nursery I suggest just one blanket draped over the crib and 1-2 simple stuffed animals in the crib if you have a lot. If you don’t have any that is perfectly fine too!
For the master bedroom, I suggest clearing off the nightstands and making the bed look fresh with a white or light-colored quilt or duvet and fluff those pillows! I’ve included some options for bedding that photographs well in my DIY Newborn Photoshoot Products list.

Finding Good Light
Good light will make more of an impact on your photos than anything else. You can have the best camera in the world but if you have crappy lighting your photos will be blown away by a camera phone and good light.
So how do you find good light for a baby photoshoot? You want soft even light that is bright. Typically photographers prefer north-facing windows but really as long as the sun isn’t blazing directly in you can work with it. Pay attention to the nursery and master bedroom and see what times of day they have the brightest soft light.

For example, my daughter’s nursery faces West so in the afternoon it starts getting hot direct sunlight. But first thing in the morning the sun is on the other side of the house so while it gets indirect light it’s not very bright. I like to do photos in her room once the sun is up overhead around 10 am–12 pm to get the most light.
Most Important! Be sure to open the blinds or curtains wide to let as much light into the room as possible. Also, turn off any lamps or ceiling lights in the room. This will give you as much natural light as possible and avoid color casts from soft white bulbs. These are my favorite shades to turn the bright harsh light soft and perfect for photos.

Phone/Camera Settings for 2025 Smartphones
iPhone 15/16 Users:
Take advantage of the improved camera system with these settings:
- Turn OFF flash (still the golden rule!)
- Use the main camera (1x) for most shots – the quality has improved dramatically
- Try the 2x zoom for detail shots of hands and feet
- Portrait mode: Adjust to f/2.0 for beautiful background blur
- Enable “Preserve Settings” to maintain your preferred camera mode
Android Users (Pixel, Samsung Galaxy):
- Use Professional/Pro mode if available
- Set ISO to 100-400 for clean images
- Focus manually by tapping your baby’s face
- Use Night mode for low-light situations (but still prefer daytime shooting)
New for 2025: Cinematic Mode Tips
If your phone has cinematic mode, try it for short video clips of your baby sleeping or making small movements. These create beautiful memories alongside your still photos.
Camera Angle Tips:
As a professional, here’s what I’ve learned: shoot slightly above your baby, never from below (avoid “shooting up the nose”). This creates the most flattering perspective and mimics how we naturally look at babies.
Also, be sure to hold steady when taking your photos and try to wait till the baby is asleep so they stay still. If you have a squirmy awake baby you notice motion blur from them moving, it means there isn’t enough light. Make sure you are doing photos on a sunny day and have opened all the blinds and curtains in the room.
Another tip with iphones is to tap the screen where you want the focus to be. You will notice a sun and a box come up. If you tap the sun and slide your finger up or down you can adjust the exposure.
If you have portrait mode on your phone now is a great time to play with it!
If you plan to take more photos of your baby (I mean who doesn’t 😍) I recommend picking up a semi-professional camera. I love the Fuji X-S10.

Props
If you look at my galleries at all you’ll see I’m not a prop photographer. I like to keep things simple and natural. The one prop I do recommend is a swaddle blanket. You can find solid or patterned blankets on Amazon or at your local Target. Here are some of my favorites on Amazon!
It’s up to you on which style you prefer. I recommend a solid if your crib sheet is patterned or your bedroom quilt is patterned. If those sheets are solid then go for a patterned swaddle blanket for a nice contrast. There really is no right or wrong here. I used a swan swaddle blanket for my daughter’s photos because her room was swan themed.
I also recommend putting baby in a simple white onesie. This gives your photos a classic look that won’t look dated or trendy down the road. Plus the white helps bounce clean light onto baby’s face. Here is an easy link to my favorites. Start with the onesie and do a set of photos and then swaddle baby and do them again for 2 different looks.

Safety First: Why Professional Training Matters
As a Master Photographer certified by the National Association of Professional Child Photographers (NAPCP), I want to emphasize: never attempt elaborate poses you see on Pinterest. Many professional newborn poses require specific training and safety knowledge.
Safe DIY Poses Only:
- Baby lying flat on secure surfaces
- Simple swaddling positions
- Parent holding baby (never unsupported poses)
- Baby in crib or bassinet
When to Call a Professional:
While these DIY tips will give you beautiful memories, professional newborn sessions capture details and poses that require specialized training. As Virginia’s Best Maternity and Newborn Photographer (2023-2024), I’ve seen the difference professional experience makes.
Posing Inspiration
I said this before in my DIY Hospital Newborn Photos blog post and it bears repeating. Put down the Pinterest board and give yourself grace. I’m not saying to not be inspired but don’t beat yourself up if yours don’t look like what you see on Pinterest.
Remember when I show up to take your photos I’m bringing 15+ years of experience plus 10k worth of equipment. I don’t hold myself to the same standards when I cook dinner at home to what a chef can make in a restaurant and you shouldn’t either!
Let’s keep this simple and focus on two poses where you can get different angles and get tons of great DIY newborn photos!

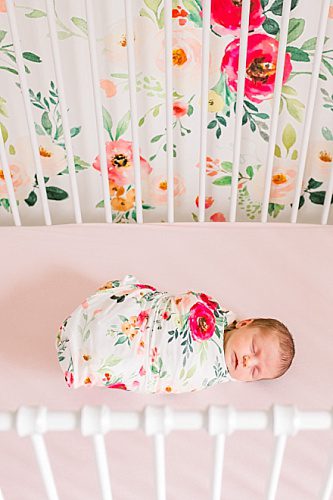
In the Crib
The first is a simple crib pose. I recommend just a white onesie to start with these. You’ll want to lay the baby in the crib so they are facing into the room. Sometimes babies prefer a certain side so if you can’t gently coax their head to look into the room try turning them around in the crib. View my list here of cribs that work well for these types of shots.
Now you can get an overhead shot like this:

Next you can move to focus on those adorable toes:

Grab a shot from the side through the rails:

Step back and get a full shot of baby in the crib:

You can play with different angles now and move around baby, remember to get close and then back up.


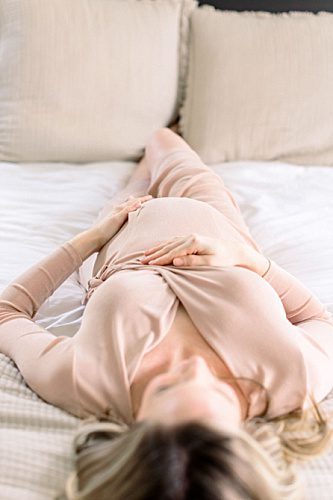
Master Bedroom
Our second pose is also very simple, I recommend swaddling your baby at this point and setting them close to the foot of the bed in the middle. Make sure you’ve cleared those nightstands of clutter and fluffed the pillows. If you have artwork over your bed this is a great shot to show that off too.

Shoot vertical and then shoot horizontal:


Shoot from over top of them:


Add in a letter-board and shoot from overtop getting everything in:


Include your Pets
Cats
Let’s start with cats! Cats tend to pop in when they feel like it and you just have to grab what you can!


Older or Calm Dogs
I only recommend this if you have calm dogs. I always get a photo with the family pet and baby but I rarely put them close to each other on a bed unless it is a very chill dog. (Keep scrolling if you have younger wilder pups!)


Younger or Energetic Pups
If you have a younger pup who is full of energy I HIGHLY recommend NOT putting baby down near them. They will most likely step or jump on baby because they just don’t pay enough attention. I have one of these types of dogs myself!
So for our more energetic furry siblings I like to keep baby safe in the crib and get the dog to come sniff through the bars or just look into the crib. The secret to this is putting a treat in the crib just out of the dogs reach but where they can smell it. Then you can photoshop the treat out of the final photo!


Editing on Your Phone
I highly recommend the Lightroom app. It is available in the app store from Adobe the makers of Photoshop. A little secret you might not know is that most photographers use Lightroom on their computers to edit your photos, not Photoshop! I rarely take an image into Photoshop for editing, 99% of my work is done in Lightroom.
There are tons of tutorials on YouTube on how to use Lightroom so I’ll let you search that out yourself. Plus you can find presets that will help with doing the editing for you. Similar to Instagram filters. Again there are too many to name but I like Noble presets and Refined presets for mobile. Update my new go to presets are A&J Mobile!

Relax
Remember you are not expected to be a professional photographer and you’ve just given birth to a beautiful baby. You are doing the best you can under very difficult circumstances. Focus on keeping things in focus and getting good light in your DIY newborn photos!

Non DIY Newborn Photos
I’m not going to lie, taking photos of your own newborn is hard! Whenever I’ve tried to do simple shoots of my babies it always takes forever or I’m so overwhelmed being a new mom again that I can’t find the time. Plus you need to be in the photos!!! Your SO needs to be in photos, you need to be in photos together with your baby!!
Please check out my Details page to learn more about hiring me for your newborn session or even a baby session when they are a couple of months old. I promise you will still cherish the photos!


baby photoshoot ideas at home
Frequently Asked Questions About DIY Newborn Photos
What’s the best age for DIY newborn photos?
Ideally 5-14 days old, when babies are sleepiest and most flexible. After 2 weeks, babies become more alert and harder to photograph.
Can I take good newborn photos with just my phone?
Absolutely! Modern smartphones (2023-2025 models) have camera quality that rivals professional equipment from just a few years ago. Focus on good lighting and composition.
What if my baby won’t sleep during the photo session?
Keep trying! Ensure baby is warm (75-78°F), well-fed, and comfortable. Sometimes a white noise app or gentle shushing helps. Remember, awake photos can be beautiful too.
How many photos should I take?
Take 200+ photos and expect to love about 10-20 of them. Digital photography allows for experimentation without cost.
Should I edit my DIY newborn photos?
Light editing can enhance your photos significantly. I recommend the Lightroom app for beginners – it’s what most professional photographers use.
Ready for Professional Newborn Photos?
While these DIY tips will help you capture precious memories, there’s something magical about professional newborn photography. As Virginia’s award-winning newborn photographer, I specialize in creating timeless, artistic images that families treasure for generations.
Why Choose Professional Newborn Photography:
- Master Photographer Certification (NAPCP)
- 14+ years of specialized experience
- Named Best Newborn Photographer in Richmond & Charlottesville (2023-2024)
- Safe posing techniques and professional equipment
- Beautiful artwork for your home
Ready to capture this fleeting newborn stage professionally? Contact me today to discuss your session. I serve families throughout Virginia including Charlottesville, Richmond, Staunton, and surrounding areas.
Don’t forget: If you found this guide helpful, save it for later and share it with other new parents. Every family deserves beautiful photos of their newest member!
How to Take Your Own DIY Newborn Photos
Taking beautiful DIY newborn photos at home is absolutely achievable with the right guidance, patience, and these proven techniques from a professional newborn photographer. Remember, while these tips will help you capture precious memories during this fleeting time, every baby and every home is different—so give yourself grace and focus on the joy of documenting your little one’s earliest days.
Whether you’re mastering how to take newborn photos with your smartphone or considering a professional session later, the most important thing is preserving these irreplaceable moments. Your baby will only be this tiny once, and with good lighting, simple poses, and the techniques I’ve shared from my 14+ years of experience, you’ll create images that tell the beautiful story of your family’s newest chapter.
And remember—if you love the results of your DIY newborn photoshoot but want to capture even more artistic images with professional equipment and expert posing, I’m here to help families throughout Virginia create heirloom-quality portraits they’ll treasure forever.
If you enjoyed this post you might also like:
How to DIY Your Hospital Newborn Photos
5 Tips for Choosing a Newborn Photographer
What to Wear for Lifestyle Newborn Photos
Melissa Arlena is an award winning lifestyle newborn photographer in Charlottesville and Richmond, Virginia who has earned her Master Photographer Certification from NAPCP in maternity, newborn and family photography. Her natural and simple work has been featured in magazines and online blogs worldwide. She has been named Best Maternity and Newborn Photographer in Richmond and Charlottesville, VA in 2024.
