At the beginning of the year I participated in several bridal shows and found myself overwhelmed with inquiries from brides. I was relying solely on my email account to help me keep up and that plan failed miserably. There were so many brides that I was not able to follow up with and I know I lost out on bookings. At that point I knew I needed to get a better system in place, something that would keep me organized and help me streamline my processes. There are several systems out there but I kept hearing over and over again about ShootQ. I really liked that they offered a free trial so I could see how it might work for my business. I will say at first it is very overwhelming to setup and can be a bit confusing if you’ve never seen it in action before. You really need to set aside a couple days where you can focus a couple hours each day to getting it configured how you like it. I recommend checking out the ShootQ videos so you can see how everything works and you won’t miss out on any features! The best videos I found were by one of the ShootQ SQUAD members, Leeann Marie. As I watched her videos I would pause the screen just to see how she had things setup so I could understand how I could use ShootQ to my advantage. So I thought since it has been awhile since I set everything up and started using it I would post about my experience!
When you first start with ShootQ they have a helpful path that you can follow to get things setup. They walk you through the main steps and you can jump around but it is nice to have some guidance on where to go next. I would suggest starting on the Settings page since that is where everything gets setup. I want to mention the help menu where you can go to the Knowledge Base to see if others have answered questions you have. Also you can get an idea of what others are doing with their ShootQ. I’ll start by walking you through the Settings page icons that I use, there are some I don’t use so I’m skipping over those.
Client Access & Correspondence
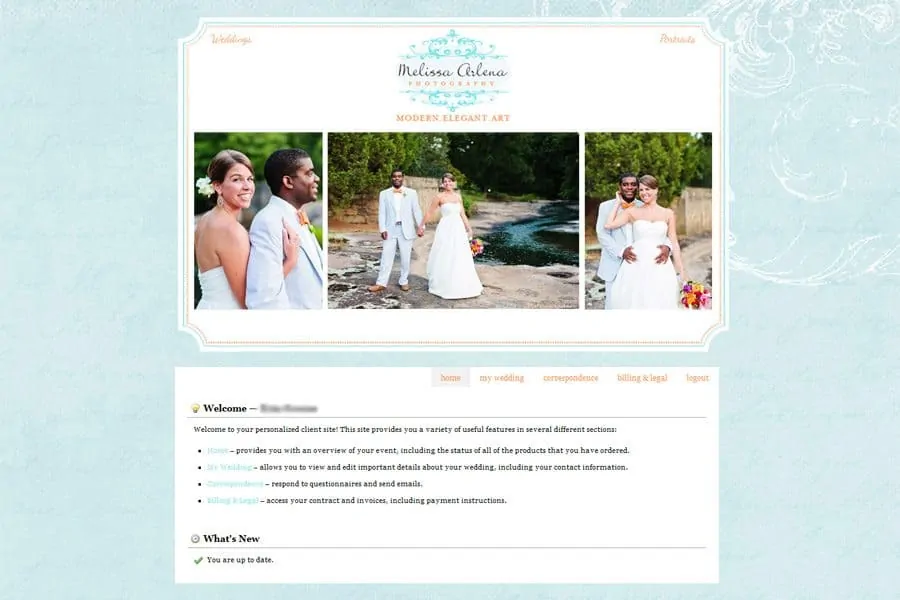
Logo & Colors: Pretty self explanatory 🙂 I love that I can brand my ShootQ client area to match my website so clients feel that it is an extension of my site and not some random page. When you are ready to setup your account I suggest having your logo, background files and RGB codes for your colors handy. This will make the branding portion go much quicker then if you are digging around to find those things. These settings will customize your Client Dashboard pages not how ShootQ looks when you login. Below you can see how my client dashboard matches my branding!

Contact Form: This is an area that I don’t really use, I have a wordpress plugin by Flauntbooks that connects my website contact form to ShootQ. Since I don’t use this form I’ll talk about what I do use. The plugin is ShootQ Integration and it was quick and easy to install. Leeann has a post about getting this all setup, I could recreate it here but I figure why re-invent the wheel ;). Now when a client fills out my contact form I get the email and it gets sent over to ShootQ and shows up as a new lead! The only thing I haven’t figured out is how to get the fields to match correctly. Right now I have to go into the ShootQ lead and fix the date of the wedding which hasn’t been a huge deal since I go in anyway to assign a status. I need to figure this out though!
Emails: This is a huge part of why I use ShootQ!! Are you tired of writing the same email over and over again with pricing information or links to your online catalogs? I’ll admit that I used to type that info up over an over again before I finally figured out how to make a template in gmail, I was lame. With ShootQ I was able to create all the template emails I needed and they are ready to send with the click of a button! Have I mentioned how much I love templates, templates for anything. They make life so much easier!!! There are several screens here where you can customize your email processes even further. I have custom signatures for all my emails with links to my Facebook page and Twitter feed along with my contact info. You will see a screen called Send Emails to Shoots, this is great for when a client emails you and it is outside your ShootQ conversation. I added the address to my email address book and whenever I email a client I always make sure that I BCC the address show here. When I do that ShootQ figures out what shoot it belongs with and files it away with that shoot, I think it is based off the clients email address but then again it could just be magic. I totally believe in magic! I do want to clarify that I like to go in and tweak my template emails, I try not to just send out a canned response email but it is nice to have the links to pricing and products already setup!
Questionnaires: Another great part of ShootQ that I use! I have several questionnaires that get sent out to clients over the course of our interaction. The first being a getting to know you form and the last being a wedding information form. It is easy for clients to fill out and they just type in the designated spots. I can then print the information on a wedding day and have everything I need right there!
So I decided I’m going to break up my ShootQ post into several posts over the next couple weeks. There is so much to cover and I don’t want to forget anything! So keep checking back on Tuesdays for more articles geared towards Photographers!
Check back next week for ShootQ : Business & Finances settings!


